Hey, are you as an android developer curious to know what exactly happens in the back-end of the API we use and dream of creating one for your own app. So you have clicked on the right link. At the end of this blog, you will learn to create a rest API using our very own Kotlin. Yes, you heard right. We will code in Kotlin itself.
So to achieve this is first we will understand what is Ktor
Ktor is an asynchronous framework for creating microservices, web applications, and more. It’s fun, free, and open source.
In simple word, Ktor is our interface to do the following stuff-
Creating HTTP APIs
Creating a WebSocket chat
Creating an interactive website
You can get more official details here.https://ktor.io/
So to start with, we'll be coding in IntelliJ ide. You can download this from this link.https://www.jetbrains.com/idea/download/
Once downloaded installation is an easy task by just doing next and finish once you complete with the installation of the ide you have to download Ktor and Kotlin plugin you can easily find it in plugin section just install and restart the ide. This will provide us with the environment for the same
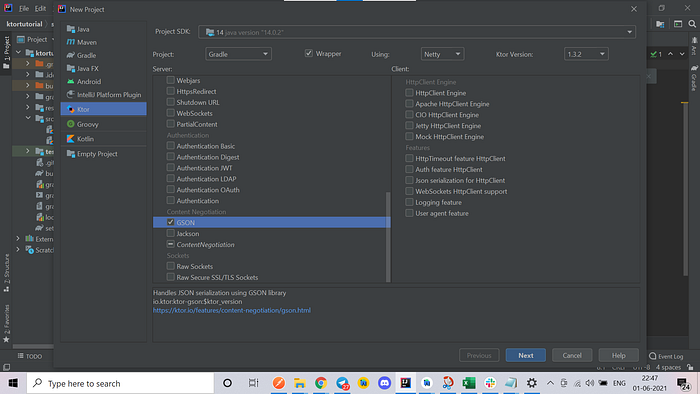
Now when you start a new project you get an option in your left panel of Ktor select that, then there are different features that we can include into our project.

We can select any feature which we want for our project from the first project we will be selecting GSON, next to Select your project SDK project: Gradle.We will need a server to deploy our API we can select any but currently, we'll be using netty
enter a project name and package details and finish.
Once the project structure is done
you can check all your dependencies in your build. Gradle file.
you can check Gradle .properties or version of the same.
So now starting with the coding part so main class in our project is Application. kt
It already consists of the main function
It consists of application .module function all are extension part will be done in this
whatever we wrote in Kotlin we need to convert it to Kotlin so these lines do the same
install(ContentNegotiation) {
        gson {
        }
No there is an application .conf file that consists of the port number if we need to change the port number we can edit from here
So as we know the APIs are of — get, post, delete,
So all these part is written in our routing function it states from where to where we wish to go
we give the endpoints and write the get, post, etc queries in the same.
So whenever you will run this project now your file will run on the server and you will get your URL in the terminal you can either test it in your browser or postman.
now what happens is there are too many requests to be made and doing it in the same function makes it complex and shabby so we will be creating a separate routing class called as the user
just right clicks on the project name to create a Kotlin class name routes. kt
Here is the entire code of my Routes where I have called all my requests, below is the explanation for each.We create a user function of route type which we will call later in Application.kt
Routes. kt
package com.weavy

import io.ktor.application.call
import io.ktor.response.respond
import io.ktor.response.respondText
import io.ktor.routing.*
import io.netty.handler.codec.http.HttpHeaderDateFormat.get

fun Route.user()
{
    get("/") {
        call.respondText("Hello world")
    }
    get("/user/{id}") {
        val id =call.parameters["id"]
        call.respondText("id is $id")
    }
    post("/user"){
        call.respond(User(1,"weavy"))
    }
    delete("/user/{id}"){
        val id =call.parameters["id"]
        call.respondText("deleted id is $id")
    }
    put{
    }    // update all together
    patch {

    }   //update a single value of data class
}

data class User(
      val id:Int,
      val name:String
)
The first request is to get a request just to get hello world as a response when we run http://0.0.0.0:8080/
here / is our endpoint
now suppose we have a user and we wish to create get post request for the same.
So firstly we create a data class user consisting of the id and name of the value
data class User(
      val id:Int,
      val name:String
)
Now the URL to get the user of a specific id will b “/user/{id}”
and in the request, we just create variable id where we pass id in it and call it in response
similarly, we can do it for the post too.
Now if we wish to display all our user we can just use this request
post(“/user”){
call.respond(User(1,”weave”))
}
To delete a specific id we write the same code in the delete request
Now we have methods to update some value in our API
put to update all values together and patch to update a single value of data class
finally we can call our routing. user function in Application .kt in routing blog. The final Application. kt is given below.
Application. kt
package com.weavy

import io.ktor.application.*
import io.ktor.response.*
import io.ktor.request.*
import io.ktor.routing.*
import io.ktor.http.*
import io.ktor.gson.*
import io.ktor.features.*

fun main(args: Array<String>): Unit = io.ktor.server.netty.EngineMain.main(args)

@Suppress("unused") // Referenced in application.conf
@kotlin.jvm.JvmOverloads
fun Application.module(testing: Boolean = false) {
    install(ContentNegotiation) {
        gson {
        }
    }

    routing {
       user()
           }
}
And that’s it here friends we have learned a simple and quick way to create rest API in Ktor next is to link these to DB.So stay tuned.
